> ## Documentation Index
> Fetch the complete documentation index at: https://docs.levelrail.com/llms.txt
> Use this file to discover all available pages before exploring further.
# Installing Levelrail
> Requirements, then every supported way to get the Levelrail control plane running on Linux with install.sh, Docker, or source build.
## What this covers
How to get the Levelrail control plane (`levelrail`) running on a Linux host, confirm it works, and upgrade or remove it later. The node agent is `levelrail-agent`, and `levelrail-cli` is the client. All three are static Go binaries.
Want only the CLI, to control an instance from your laptop? Jump to [Installing just the CLI](#installing-just-the-cli). `install.sh` sets up the server, not a remote client.
**Recommended.** One command provisions Docker, a systemd unit, and the control plane on a real Linux server.
Already running everything else as containers? Pull the published images instead.
For contributors, unreleased commits, or trying Levelrail locally without a server.
## Requirements
Confirm these before you provision a server.
| Item | Requirement |
| - | - |
| OS | Linux, `amd64` or `arm64`, with systemd. Tested in CI on Ubuntu 24.04 and Debian 12; other distros should work but are untested. Windows and non-Linux nodes are not supported. |
| Docker | 24 or newer. `install.sh` installs it via `get.docker.com` if it is missing. |
| Access | Root, plus `curl`. |
| Ports (control-plane node) | `80/tcp` and `443/tcp` inbound from the internet. Port 80 is required for Let's Encrypt HTTP-01. Optionally `443/udp` for HTTP/3. |
| Ports (agent-only nodes) | None. The agent dials out and the control plane never initiates a connection. See [Multi-node](/multi-node). |
| Starting size | 1 vCPU, 1 GB RAM, 10 GB disk boots Docker and the control plane. 2 vCPU, 2 GB RAM, 20 GB disk is more comfortable once builds and apps run. |
No official minimum has been benchmarked or published (see the [roadmap](/roadmap)). The sizes above are a starting point, not a hard requirement. The control plane itself checks no minimum.
**What `install.sh` preflight checks:** root, architecture, OS, systemd, `curl`, Docker version, RAM, free disk and ports 80/443/8080. It stops on a failed check unless you pass `--force`. RAM below 1 GB only warns (`LEVELRAIL_MIN_RAM_MB`); free disk below 10 GB on the data directory's filesystem fails (`LEVELRAIL_MIN_DISK_GB`).
**After install:** `levelrail-cli doctor` (`GET /api/v1/system/doctor`) checks Docker reachability, free disk (warns below 1 GiB by default), data-directory writability, and that ports 80/443 are free to bind. It checks no memory or CPU floor. If a port is blocked, see [Domains and ingress: firewall](/domains-and-ingress#firewall-ports-80-and-443).
## Option 1: install.sh (recommended)
```bash theme={"dark"}
curl -fsSL https://levelrail.com/install.sh | sudo sh
```
The script:
* Runs the preflight table and stops on a failed check (`--force` continues anyway).
* Installs Docker via `get.docker.com` if missing.
* Downloads the newest release for `linux/amd64` or `linux/arm64` and verifies its SHA-256 checksum.
* Installs `levelrail-cli` to `/usr/local/bin` from the same release (skip with `LEVELRAIL_INSTALL_CLI=0`).
* Writes a `levelrail.service` systemd unit, starts it, and waits for `GET /healthz`.
* Checks that ports 80 and 443 answer on the server's public IP, and prints the `ufw`/`firewalld` commands to open them if not.
* Prints the dashboard URL, the one-time **setup token** for the first admin, and a reminder to back up `/master.key`.
A missing `checksums.txt` is a hard failure unless you set `LEVELRAIL_SKIP_CHECKSUM=1`. While no stable release exists, the installer picks the newest pre-release; choose explicitly with `LEVELRAIL_CHANNEL=stable|beta`. A release with no binary for your architecture is skipped with a warning. Some providers never route a server's own public IP back to itself, so treat a failed reachability test as a hint, not proof.
### First sign-in
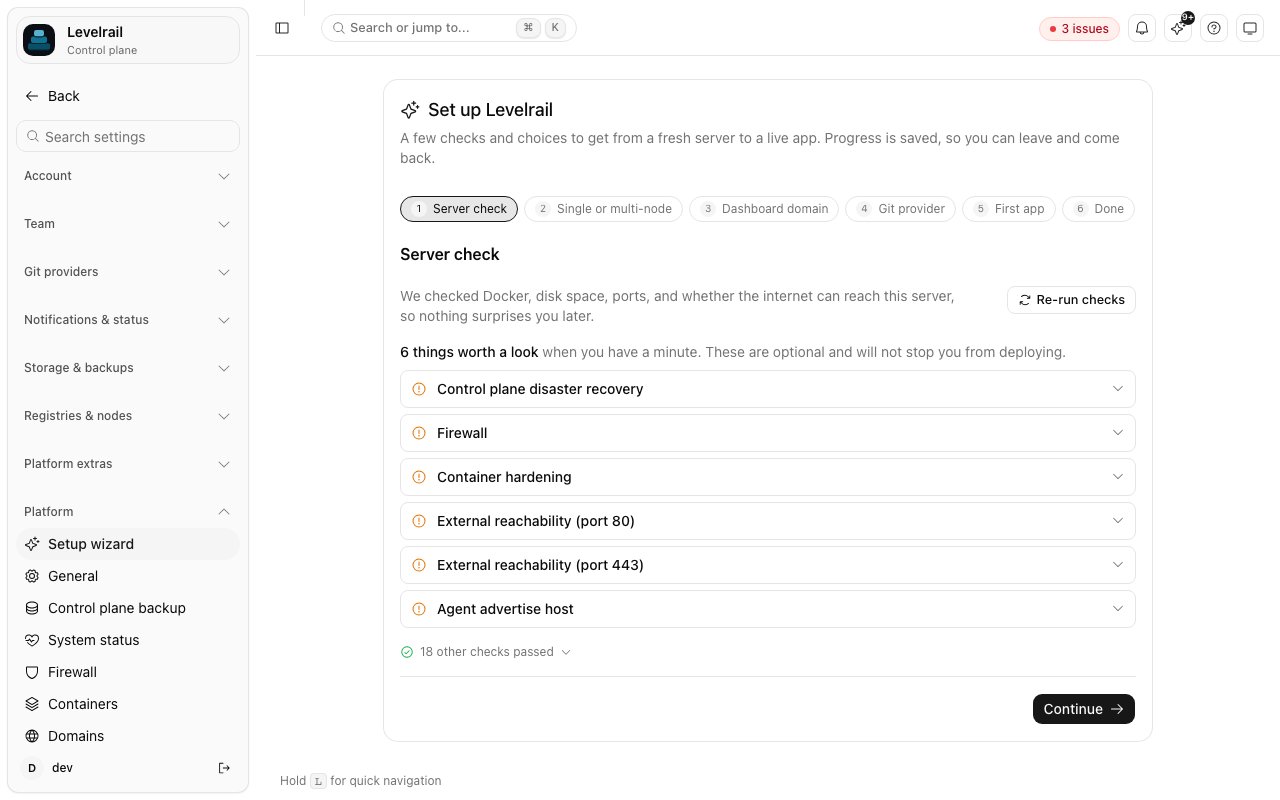 Open one of the `http://:8080/login?setup=` links from the install summary. The public address is printed first, then private addresses. Container bridge addresses are hidden.
**8080 is only the default.** If that port was taken, `install.sh` picks the next free one (`LEVELRAIL_DASHBOARD_PORT`) and prints the real one. Use the port from your own output.
After you create the admin account, the setup wizard opens and runs the server checks shown above.
The dashboard shows a "connection is not encrypted" banner until you enable HTTPS. Once you have an `https://` **dashboard URL**, sign-in over plain HTTP is refused.
Open the Domains page and click **Enable HTTPS**. It issues a real Let's Encrypt certificate for `.sslip.io`, no DNS needed. See [Domains and ingress](/domains-and-ingress#zero-dns-setup-sslipio-hostnames-and-one-click-https).
```bash theme={"dark"}
levelrail-cli settings ingress https enable --email you@yourdomain.com
```
Set a primary domain plus ACME on the Domains page.
**Pick a dashboard-only subdomain, not an app's own domain**, such as `console.example.com` or `panel.example.com` (the same convention CapRover uses for `captain.`). Reusing a domain an app already serves breaks whichever one loses the conflict, silently. See [Domains and ingress](/domains-and-ingress#the-dashboards-own-domain).
Print the token again on the server. The dashboard port is also in the unit file:
```bash theme={"dark"}
sudo APP_DATA_DIR=/var/lib/levelrail-data levelrail setup-token
systemctl cat levelrail | grep APP_HTTP_ADDR
```
Set `APP_ADMIN_USERNAME` and `APP_ADMIN_PASSWORD` in the unit (via `sudo systemctl edit levelrail`) before the first start.
Allow plain HTTP sign-in temporarily. Run `sudo systemctl edit levelrail`, add the lines below, then restart:
```ini theme={"dark"}
[Service]
Environment=APP_ALLOW_INSECURE_LOGIN=true
```
AI chat, AI models, the [load balancer](/load-balancing), [platform as code](/platform-as-code) and Cloudflare Tunnel are hidden until you opt in with `APP_EXPERIMENTAL`, see [experimental features](/experimental-features).
### Common scenarios
```bash Pin a specific release theme={"dark"}
curl -fsSL https://levelrail.com/install.sh \
| sudo LEVELRAIL_VERSION=v0.2.0-beta.5 sh
```
```bash Custom data directory theme={"dark"}
curl -fsSL https://levelrail.com/install.sh \
| sudo LEVELRAIL_DATA_DIR=/data/levelrail sh
```
```bash Configure UFW automatically theme={"dark"}
curl -fsSL https://levelrail.com/install.sh \
| sudo LEVELRAIL_CONFIGURE_UFW=1 sh
```
```bash Ignore a failed preflight check theme={"dark"}
curl -fsSL https://levelrail.com/install.sh \
| sudo sh -s -- --force
```
| Variable | Default | What it does |
| - | - | - |
| `LEVELRAIL_VERSION` | newest release | Pin a specific release tag |
| `LEVELRAIL_CHANNEL` | stable, else newest pre-release | `stable` or `beta` |
| `LEVELRAIL_INSTALL_DIR` | `/usr/local/bin` | Where the `levelrail` binary is installed |
| `LEVELRAIL_DATA_DIR` | `/var/lib/levelrail-data` | Control plane data directory (SQLite database, master key, setup token, generated `brand.yaml`) |
| `LEVELRAIL_INSTALL_CLI` | `1` | Set to `0` to skip installing `levelrail-cli` to `/usr/local/bin` |
| `LEVELRAIL_BINARY_FILE` | unset | Install a local binary instead of downloading one |
| `LEVELRAIL_BINARY_URL` | unset | Download the binary from this URL instead (no checksum verification) |
| `LEVELRAIL_SKIP_CHECKSUM` | unset | Set to `1` to install even when the release publishes no `checksums.txt` (or omits the binary from it) |
| `LEVELRAIL_PUBLIC_IP` | discovered | Public IP used for the reachability test and summary |
| `LEVELRAIL_SKIP_REACHABILITY` | unset | Set to `1` to skip the port 80/443 test |
| `LEVELRAIL_MIN_RAM_MB` / `LEVELRAIL_MIN_DISK_GB` / `LEVELRAIL_MIN_DOCKER_MAJOR` | `1024` / `10` / `24` | Preflight thresholds |
| `LEVELRAIL_HEALTH_WAIT` | `60` | Seconds to wait for the service to become healthy |
| `LEVELRAIL_SOCKET_ACTIVATION` | unset (on for a new install) | systemd holds ports 80/443, so restarting the control plane queues connections instead of refusing them. Set `0` to let the control plane bind the ports itself. On `upgrade`, unset keeps the current mode, `1` switches an existing install over and `0` switches it back. See [Surviving a control plane restart](/domains-and-ingress#surviving-a-control-plane-restart). |
| `LEVELRAIL_CONFIGURE_UFW` | unset (off) | Set to `1` to allow SSH, then 80/443 (and 443/udp for HTTP/3), then enable `ufw` if it was not active. The script never touches your firewall otherwise. |
| `LEVELRAIL_DASHBOARD_PORT` | `8080` | Dashboard/API port. If the default is taken the installer picks the next free port; set this to pin one |
| `LEVELRAIL_HTTP_PORT` / `LEVELRAIL_HTTPS_PORT` | `80` / `443` | Ingress ports. The installer never moves these without consent: Let's Encrypt only validates on 80/443. If either is taken, preflight names the holder and offers [coexist mode](#server-already-runs-a-proxy). Setting both explicitly means no automatic ACME TLS |
| `LEVELRAIL_COEXIST` | unset | `1` (or `--coexist`) runs behind an existing proxy: ingress on 8088/8443, dashboard on loopback. `0` is `--no-coexist` |
| `LEVELRAIL_COEXIST_HTTP_PORT` / `LEVELRAIL_COEXIST_HTTPS_PORT` | `8088` / `8443` | Ingress ports coexist mode uses |
| `APP_PUBLIC_HOST` | unset | Written to the systemd drop-in so the control plane knows its public address |
| `LEVELRAIL_DOMAIN` | unset | Same as `--domain`: only used to print the exact `levelrail-cli proxy` command |
| `APP_INSTALL_VERIFY` | `auto` | `auto`, `require` or `off`. See [Verifying release binaries](#verifying-release-binaries) |
| `LEVELRAIL_NO_COSIGN` | unset | `1` is the same as `--no-cosign` |
### Check the server first
`install.sh --check` is a read-only readiness report. It changes nothing and runs without root (port owners are then only partly visible).
```bash theme={"dark"}
curl -fsSL https://levelrail.com/install.sh | sh -s -- --check --domain apps.example.com
```
```bash theme={"dark"}
levelrail-cli readiness [--domain D]
```
`GET /api/v1/system/readiness`, or **Settings > Updates > Server readiness** in the dashboard.
It reports who holds ports 80 and 443 (Traefik, nginx, Caddy, Apache, HAProxy, a container or a host process), the Docker version and whether the daemon is rootless, whether the Docker API is exposed on the network, free disk, memory, the [host firewall](/host-firewall), and whether the domain you give resolves to this server. It ends with the recommended mode, own ports or behind your existing proxy, and the exact command to run next. It exits non-zero when a check fails.
### Server already runs a proxy
Coolify, Traefik, nginx or Caddy on the same box already hold ports 80 and 443, so a default install would start but never serve or issue certificates. The installer checks this before it changes anything (`ss`, and `docker ps --filter publish=` to name a container and image):
```text theme={"dark"}
Ports 80 443 are already in use on this server:
80: container coolify-proxy (image traefik:v3.1)
443: container coolify-proxy (image traefik:v3.1)
Levelrail can run alongside it: ingress on 8088/8443, dashboard on loopback only, ...
```
If both ports are free nothing changes. If they are taken, the installer switches to **coexist mode** by itself and says so. Pass `--no-coexist` (or `LEVELRAIL_COEXIST=0`) to fail preflight instead.
| Setting | Coexist value |
| - | - |
| Ingress HTTP / HTTPS | `8088` / `8443` (override with `--http-port`/`--https-port` or `LEVELRAIL_COEXIST_HTTP_PORT`/`LEVELRAIL_COEXIST_HTTPS_PORT`) |
| Dashboard | `127.0.0.1:`, reachable by SSH tunnel until your proxy fronts it |
| `ufw` | left alone, even with `LEVELRAIL_CONFIGURE_UFW=1` |
The installer never prompts. Pass `--coexist` (or `LEVELRAIL_COEXIST=1`) to choose the mode up front, for example to move a server whose ports are currently free:
```bash theme={"dark"}
curl -fsSL https://levelrail.com/install.sh | sudo sh -s -- --coexist --domain apps.example.com
```
`--domain` only fills in the next command, which the installer prints at the end:
```bash theme={"dark"}
levelrail-cli proxy --domain apps.example.com --verify
```
To move an existing install behind a proxy later: `sudo sh install.sh upgrade --coexist`.
See [Behind an existing proxy](/behind-an-existing-proxy) for the proxy side. Let's Encrypt only validates on 80/443, so certificates for these domains are issued by your existing proxy, not Levelrail.
Every address the installer chooses (`APP_HTTP_ADDR`, `APP_INGRESS_HTTP_ADDR`, `APP_INGRESS_HTTPS_ADDR`, and `APP_PUBLIC_HOST` when you set it) is written to a systemd drop-in, `/etc/systemd/system/levelrail.service.d/10-install.conf`, never into the main unit.
* `install.sh upgrade` reads it back and does not rewrite it, so custom ports survive upgrades, including the socket-activation switch that regenerates the main unit.
* Installs made before the drop-in existed are migrated on their next upgrade (ports are read from the old main unit).
* If the main unit no longer matches what the installer would write (hand edits or an older installer), `upgrade` warns and, if it has to regenerate the unit, keeps a copy at `levelrail.service.pre-upgrade`.
* Keep your own overrides in a later-sorting drop-in such as `override.conf` (`systemctl edit levelrail`).
### Verifying release binaries
Each release publishes `checksums.txt` (SHA-256 of every CLI, agent and control plane binary), a keyless [cosign](https://docs.sigstore.dev/cosign/overview/) signature bundle for it (`checksums.txt.sigstore.json`), and a GitHub build provenance attestation for the binaries. Releases cut before signing was added carry no bundle.
`install.sh` always verifies the SHA-256 checksum and refuses to install on a mismatch. It also verifies the signature when `cosign` is installed and the release ships a bundle.
| `APP_INSTALL_VERIFY` | Behavior |
| - | - |
| `auto` (default) | Verify the signature when cosign is installed and a bundle exists |
| `require` | Abort unless the signature verifies (no cosign, no bundle, or a bad signature all abort) |
| `off` | Skip only the signature step. The checksum is still verified |
```bash theme={"dark"}
curl -fsSL https://levelrail.com/install.sh \
| sudo APP_INSTALL_VERIFY=require sh
```
When `cosign` is not on `PATH`, `install` and `upgrade` download a pinned cosign release (v3.1.3, `linux/amd64` or `linux/arm64`) from the official sigstore GitHub releases, check it against a SHA-256 pinned inside `install.sh`, and place it at `/usr/local/bin/cosign`. An existing cosign is never touched.
If the download fails (offline host, blocked GitHub, wrong checksum) the installer warns and carries on with checksum-only verification. Opt out with `--no-cosign` or `LEVELRAIL_NO_COSIGN=1`.
To install it on its own, for example to clear the Settings > Updates warning (this subcommand does fail loudly if it cannot install):
```bash theme={"dark"}
curl -fsSL https://levelrail.com/install.sh | sudo sh -s -- install-cosign
```
```bash theme={"dark"}
V=v0.1.0 # the release tag
BASE=https://github.com/glincker/levelrail/releases/download/$V
curl -fsSLO $BASE/checksums.txt -O $BASE/checksums.txt.sigstore.json -O $BASE/levelrail-linux-amd64
cosign verify-blob --bundle checksums.txt.sigstore.json \
--certificate-identity-regexp 'https://github.com/glincker/levelrail/\.github/workflows/release\.yml@.*' \
--certificate-oidc-issuer https://token.actions.githubusercontent.com \
checksums.txt
sha256sum --check --ignore-missing checksums.txt
gh attestation verify levelrail-linux-amd64 --repo glincker/levelrail
```
## Option 2: Docker
Already running everything else as containers? See [Docker](/docker) for `docker run` and `docker-compose.yml` examples.
Images (both `linux/amd64` and `linux/arm64`, multi-arch):
* `ghcr.io/glincker/levelrail` (control plane)
* `ghcr.io/glincker/levelrail-agent` (node agent)
| Tag | Built from | Stability |
| - | - | - |
| `:latest`, `:vX.Y`, `:vX.Y.Z` | a non-prerelease tag (`v1.2.3`) | stable release |
| `:beta` | a prerelease tag (`v1.2.3-beta.1`, `-rc.1`, etc.) | prerelease |
| `:edge` | manual dispatch of the Release workflow against `main` | unreleased, use for testing only |
`:latest` and `:vX.Y` only move on a stable tag; `:beta` moves on every prerelease tag. `:edge` moves only when someone manually triggers a build against `main`, not on every push. Pin an exact `:vX.Y.Z` tag for anything you care about staying still.
**No stable release yet.** No non-prerelease tag has shipped as of this writing, so `:latest` currently points at an old beta build, not the newest one. **Use `:beta` until the first stable release ships**, then switch to `:latest`.
`install.sh` remains the recommended path for a real single-node deployment since it also provisions Docker and a systemd unit. The Docker image is for operators who want Levelrail to fit into an existing container-only setup.
### Verifying image signatures
Every image is signed keylessly with [cosign](https://docs.sigstore.dev/cosign/overview/) via GitHub Actions OIDC (no long-lived signing key). Verify a pulled image against this repository's release workflow:
```bash theme={"dark"}
cosign verify ghcr.io/glincker/levelrail:beta \
--certificate-identity-regexp 'https://github.com/glincker/levelrail/\.github/workflows/release\.yml@.*' \
--certificate-oidc-issuer https://token.actions.githubusercontent.com
```
Swap in `levelrail-agent` and any tag from the table above.
SBOM (SPDX) and provenance (SLSA) are attached as build attestations, not the older `cosign attach-sbom` format, so `cosign download sbom` does not find them. Read them with `docker buildx imagetools inspect`:
```bash theme={"dark"}
docker buildx imagetools inspect ghcr.io/glincker/levelrail:beta --format '{{ json .SBOM }}'
docker buildx imagetools inspect ghcr.io/glincker/levelrail:beta --format '{{ json .Provenance }}'
```
## Option 3: build from source
The path for contributors, anyone running an unreleased commit, or trying Levelrail on a laptop without a server. See `CONTRIBUTING.md` in the repository for branch and commit conventions and how to run the tests.
**Requirements:** Go 1.26 or newer, a running Docker daemon, and Node.js with npm only if you build the frontend yourself.
```bash theme={"dark"}
go build ./cmd/levelrail # control plane
go build ./cmd/levelrail-agent # node agent
go build ./cmd/levelrail-cli # CLI
```
The frontend is a separate Vite project in `web/`, embedded into the control plane binary at build time, so production runs no Node process. See `web/README.md` for the frontend commands.
```bash theme={"dark"}
cd web
npm install
npm run dev # Vite dev server
npm run build # type-check and production build
```
The control plane listens on `:8080` by default. For a throwaway local instance, start it with `APP_DEV_MODE=1`: it creates a fixed `dev`/`dev` admin and fixed API tokens from `dev-fixtures.yml` so you can skip sign-up.
Dev mode is for local use only. A release build (`-tags embedweb`) ignores `APP_DEV_MODE`, so it can never run this way in production.
## Installing just the CLI
`levelrail-cli` is a separate, small client binary for your own laptop or a CI runner, the same shape as `aws` or `gh`: install it locally, point it at a running instance, authenticate over the network, no SSH key and no inbound port on the server. The dashboard prints these same steps under **Settings, CLI access**, with a copy button on each command.
Open one of the `http://:8080/login?setup=` links from the install summary. The public address is printed first, then private addresses. Container bridge addresses are hidden.
**8080 is only the default.** If that port was taken, `install.sh` picks the next free one (`LEVELRAIL_DASHBOARD_PORT`) and prints the real one. Use the port from your own output.
After you create the admin account, the setup wizard opens and runs the server checks shown above.
The dashboard shows a "connection is not encrypted" banner until you enable HTTPS. Once you have an `https://` **dashboard URL**, sign-in over plain HTTP is refused.
Open the Domains page and click **Enable HTTPS**. It issues a real Let's Encrypt certificate for `.sslip.io`, no DNS needed. See [Domains and ingress](/domains-and-ingress#zero-dns-setup-sslipio-hostnames-and-one-click-https).
```bash theme={"dark"}
levelrail-cli settings ingress https enable --email you@yourdomain.com
```
Set a primary domain plus ACME on the Domains page.
**Pick a dashboard-only subdomain, not an app's own domain**, such as `console.example.com` or `panel.example.com` (the same convention CapRover uses for `captain.`). Reusing a domain an app already serves breaks whichever one loses the conflict, silently. See [Domains and ingress](/domains-and-ingress#the-dashboards-own-domain).
Print the token again on the server. The dashboard port is also in the unit file:
```bash theme={"dark"}
sudo APP_DATA_DIR=/var/lib/levelrail-data levelrail setup-token
systemctl cat levelrail | grep APP_HTTP_ADDR
```
Set `APP_ADMIN_USERNAME` and `APP_ADMIN_PASSWORD` in the unit (via `sudo systemctl edit levelrail`) before the first start.
Allow plain HTTP sign-in temporarily. Run `sudo systemctl edit levelrail`, add the lines below, then restart:
```ini theme={"dark"}
[Service]
Environment=APP_ALLOW_INSECURE_LOGIN=true
```
AI chat, AI models, the [load balancer](/load-balancing), [platform as code](/platform-as-code) and Cloudflare Tunnel are hidden until you opt in with `APP_EXPERIMENTAL`, see [experimental features](/experimental-features).
### Common scenarios
```bash Pin a specific release theme={"dark"}
curl -fsSL https://levelrail.com/install.sh \
| sudo LEVELRAIL_VERSION=v0.2.0-beta.5 sh
```
```bash Custom data directory theme={"dark"}
curl -fsSL https://levelrail.com/install.sh \
| sudo LEVELRAIL_DATA_DIR=/data/levelrail sh
```
```bash Configure UFW automatically theme={"dark"}
curl -fsSL https://levelrail.com/install.sh \
| sudo LEVELRAIL_CONFIGURE_UFW=1 sh
```
```bash Ignore a failed preflight check theme={"dark"}
curl -fsSL https://levelrail.com/install.sh \
| sudo sh -s -- --force
```
| Variable | Default | What it does |
| - | - | - |
| `LEVELRAIL_VERSION` | newest release | Pin a specific release tag |
| `LEVELRAIL_CHANNEL` | stable, else newest pre-release | `stable` or `beta` |
| `LEVELRAIL_INSTALL_DIR` | `/usr/local/bin` | Where the `levelrail` binary is installed |
| `LEVELRAIL_DATA_DIR` | `/var/lib/levelrail-data` | Control plane data directory (SQLite database, master key, setup token, generated `brand.yaml`) |
| `LEVELRAIL_INSTALL_CLI` | `1` | Set to `0` to skip installing `levelrail-cli` to `/usr/local/bin` |
| `LEVELRAIL_BINARY_FILE` | unset | Install a local binary instead of downloading one |
| `LEVELRAIL_BINARY_URL` | unset | Download the binary from this URL instead (no checksum verification) |
| `LEVELRAIL_SKIP_CHECKSUM` | unset | Set to `1` to install even when the release publishes no `checksums.txt` (or omits the binary from it) |
| `LEVELRAIL_PUBLIC_IP` | discovered | Public IP used for the reachability test and summary |
| `LEVELRAIL_SKIP_REACHABILITY` | unset | Set to `1` to skip the port 80/443 test |
| `LEVELRAIL_MIN_RAM_MB` / `LEVELRAIL_MIN_DISK_GB` / `LEVELRAIL_MIN_DOCKER_MAJOR` | `1024` / `10` / `24` | Preflight thresholds |
| `LEVELRAIL_HEALTH_WAIT` | `60` | Seconds to wait for the service to become healthy |
| `LEVELRAIL_SOCKET_ACTIVATION` | unset (on for a new install) | systemd holds ports 80/443, so restarting the control plane queues connections instead of refusing them. Set `0` to let the control plane bind the ports itself. On `upgrade`, unset keeps the current mode, `1` switches an existing install over and `0` switches it back. See [Surviving a control plane restart](/domains-and-ingress#surviving-a-control-plane-restart). |
| `LEVELRAIL_CONFIGURE_UFW` | unset (off) | Set to `1` to allow SSH, then 80/443 (and 443/udp for HTTP/3), then enable `ufw` if it was not active. The script never touches your firewall otherwise. |
| `LEVELRAIL_DASHBOARD_PORT` | `8080` | Dashboard/API port. If the default is taken the installer picks the next free port; set this to pin one |
| `LEVELRAIL_HTTP_PORT` / `LEVELRAIL_HTTPS_PORT` | `80` / `443` | Ingress ports. The installer never moves these without consent: Let's Encrypt only validates on 80/443. If either is taken, preflight names the holder and offers [coexist mode](#server-already-runs-a-proxy). Setting both explicitly means no automatic ACME TLS |
| `LEVELRAIL_COEXIST` | unset | `1` (or `--coexist`) runs behind an existing proxy: ingress on 8088/8443, dashboard on loopback. `0` is `--no-coexist` |
| `LEVELRAIL_COEXIST_HTTP_PORT` / `LEVELRAIL_COEXIST_HTTPS_PORT` | `8088` / `8443` | Ingress ports coexist mode uses |
| `APP_PUBLIC_HOST` | unset | Written to the systemd drop-in so the control plane knows its public address |
| `LEVELRAIL_DOMAIN` | unset | Same as `--domain`: only used to print the exact `levelrail-cli proxy` command |
| `APP_INSTALL_VERIFY` | `auto` | `auto`, `require` or `off`. See [Verifying release binaries](#verifying-release-binaries) |
| `LEVELRAIL_NO_COSIGN` | unset | `1` is the same as `--no-cosign` |
### Check the server first
`install.sh --check` is a read-only readiness report. It changes nothing and runs without root (port owners are then only partly visible).
```bash theme={"dark"}
curl -fsSL https://levelrail.com/install.sh | sh -s -- --check --domain apps.example.com
```
```bash theme={"dark"}
levelrail-cli readiness [--domain D]
```
`GET /api/v1/system/readiness`, or **Settings > Updates > Server readiness** in the dashboard.
It reports who holds ports 80 and 443 (Traefik, nginx, Caddy, Apache, HAProxy, a container or a host process), the Docker version and whether the daemon is rootless, whether the Docker API is exposed on the network, free disk, memory, the [host firewall](/host-firewall), and whether the domain you give resolves to this server. It ends with the recommended mode, own ports or behind your existing proxy, and the exact command to run next. It exits non-zero when a check fails.
### Server already runs a proxy
Coolify, Traefik, nginx or Caddy on the same box already hold ports 80 and 443, so a default install would start but never serve or issue certificates. The installer checks this before it changes anything (`ss`, and `docker ps --filter publish=` to name a container and image):
```text theme={"dark"}
Ports 80 443 are already in use on this server:
80: container coolify-proxy (image traefik:v3.1)
443: container coolify-proxy (image traefik:v3.1)
Levelrail can run alongside it: ingress on 8088/8443, dashboard on loopback only, ...
```
If both ports are free nothing changes. If they are taken, the installer switches to **coexist mode** by itself and says so. Pass `--no-coexist` (or `LEVELRAIL_COEXIST=0`) to fail preflight instead.
| Setting | Coexist value |
| - | - |
| Ingress HTTP / HTTPS | `8088` / `8443` (override with `--http-port`/`--https-port` or `LEVELRAIL_COEXIST_HTTP_PORT`/`LEVELRAIL_COEXIST_HTTPS_PORT`) |
| Dashboard | `127.0.0.1:`, reachable by SSH tunnel until your proxy fronts it |
| `ufw` | left alone, even with `LEVELRAIL_CONFIGURE_UFW=1` |
The installer never prompts. Pass `--coexist` (or `LEVELRAIL_COEXIST=1`) to choose the mode up front, for example to move a server whose ports are currently free:
```bash theme={"dark"}
curl -fsSL https://levelrail.com/install.sh | sudo sh -s -- --coexist --domain apps.example.com
```
`--domain` only fills in the next command, which the installer prints at the end:
```bash theme={"dark"}
levelrail-cli proxy --domain apps.example.com --verify
```
To move an existing install behind a proxy later: `sudo sh install.sh upgrade --coexist`.
See [Behind an existing proxy](/behind-an-existing-proxy) for the proxy side. Let's Encrypt only validates on 80/443, so certificates for these domains are issued by your existing proxy, not Levelrail.
Every address the installer chooses (`APP_HTTP_ADDR`, `APP_INGRESS_HTTP_ADDR`, `APP_INGRESS_HTTPS_ADDR`, and `APP_PUBLIC_HOST` when you set it) is written to a systemd drop-in, `/etc/systemd/system/levelrail.service.d/10-install.conf`, never into the main unit.
* `install.sh upgrade` reads it back and does not rewrite it, so custom ports survive upgrades, including the socket-activation switch that regenerates the main unit.
* Installs made before the drop-in existed are migrated on their next upgrade (ports are read from the old main unit).
* If the main unit no longer matches what the installer would write (hand edits or an older installer), `upgrade` warns and, if it has to regenerate the unit, keeps a copy at `levelrail.service.pre-upgrade`.
* Keep your own overrides in a later-sorting drop-in such as `override.conf` (`systemctl edit levelrail`).
### Verifying release binaries
Each release publishes `checksums.txt` (SHA-256 of every CLI, agent and control plane binary), a keyless [cosign](https://docs.sigstore.dev/cosign/overview/) signature bundle for it (`checksums.txt.sigstore.json`), and a GitHub build provenance attestation for the binaries. Releases cut before signing was added carry no bundle.
`install.sh` always verifies the SHA-256 checksum and refuses to install on a mismatch. It also verifies the signature when `cosign` is installed and the release ships a bundle.
| `APP_INSTALL_VERIFY` | Behavior |
| - | - |
| `auto` (default) | Verify the signature when cosign is installed and a bundle exists |
| `require` | Abort unless the signature verifies (no cosign, no bundle, or a bad signature all abort) |
| `off` | Skip only the signature step. The checksum is still verified |
```bash theme={"dark"}
curl -fsSL https://levelrail.com/install.sh \
| sudo APP_INSTALL_VERIFY=require sh
```
When `cosign` is not on `PATH`, `install` and `upgrade` download a pinned cosign release (v3.1.3, `linux/amd64` or `linux/arm64`) from the official sigstore GitHub releases, check it against a SHA-256 pinned inside `install.sh`, and place it at `/usr/local/bin/cosign`. An existing cosign is never touched.
If the download fails (offline host, blocked GitHub, wrong checksum) the installer warns and carries on with checksum-only verification. Opt out with `--no-cosign` or `LEVELRAIL_NO_COSIGN=1`.
To install it on its own, for example to clear the Settings > Updates warning (this subcommand does fail loudly if it cannot install):
```bash theme={"dark"}
curl -fsSL https://levelrail.com/install.sh | sudo sh -s -- install-cosign
```
```bash theme={"dark"}
V=v0.1.0 # the release tag
BASE=https://github.com/glincker/levelrail/releases/download/$V
curl -fsSLO $BASE/checksums.txt -O $BASE/checksums.txt.sigstore.json -O $BASE/levelrail-linux-amd64
cosign verify-blob --bundle checksums.txt.sigstore.json \
--certificate-identity-regexp 'https://github.com/glincker/levelrail/\.github/workflows/release\.yml@.*' \
--certificate-oidc-issuer https://token.actions.githubusercontent.com \
checksums.txt
sha256sum --check --ignore-missing checksums.txt
gh attestation verify levelrail-linux-amd64 --repo glincker/levelrail
```
## Option 2: Docker
Already running everything else as containers? See [Docker](/docker) for `docker run` and `docker-compose.yml` examples.
Images (both `linux/amd64` and `linux/arm64`, multi-arch):
* `ghcr.io/glincker/levelrail` (control plane)
* `ghcr.io/glincker/levelrail-agent` (node agent)
| Tag | Built from | Stability |
| - | - | - |
| `:latest`, `:vX.Y`, `:vX.Y.Z` | a non-prerelease tag (`v1.2.3`) | stable release |
| `:beta` | a prerelease tag (`v1.2.3-beta.1`, `-rc.1`, etc.) | prerelease |
| `:edge` | manual dispatch of the Release workflow against `main` | unreleased, use for testing only |
`:latest` and `:vX.Y` only move on a stable tag; `:beta` moves on every prerelease tag. `:edge` moves only when someone manually triggers a build against `main`, not on every push. Pin an exact `:vX.Y.Z` tag for anything you care about staying still.
**No stable release yet.** No non-prerelease tag has shipped as of this writing, so `:latest` currently points at an old beta build, not the newest one. **Use `:beta` until the first stable release ships**, then switch to `:latest`.
`install.sh` remains the recommended path for a real single-node deployment since it also provisions Docker and a systemd unit. The Docker image is for operators who want Levelrail to fit into an existing container-only setup.
### Verifying image signatures
Every image is signed keylessly with [cosign](https://docs.sigstore.dev/cosign/overview/) via GitHub Actions OIDC (no long-lived signing key). Verify a pulled image against this repository's release workflow:
```bash theme={"dark"}
cosign verify ghcr.io/glincker/levelrail:beta \
--certificate-identity-regexp 'https://github.com/glincker/levelrail/\.github/workflows/release\.yml@.*' \
--certificate-oidc-issuer https://token.actions.githubusercontent.com
```
Swap in `levelrail-agent` and any tag from the table above.
SBOM (SPDX) and provenance (SLSA) are attached as build attestations, not the older `cosign attach-sbom` format, so `cosign download sbom` does not find them. Read them with `docker buildx imagetools inspect`:
```bash theme={"dark"}
docker buildx imagetools inspect ghcr.io/glincker/levelrail:beta --format '{{ json .SBOM }}'
docker buildx imagetools inspect ghcr.io/glincker/levelrail:beta --format '{{ json .Provenance }}'
```
## Option 3: build from source
The path for contributors, anyone running an unreleased commit, or trying Levelrail on a laptop without a server. See `CONTRIBUTING.md` in the repository for branch and commit conventions and how to run the tests.
**Requirements:** Go 1.26 or newer, a running Docker daemon, and Node.js with npm only if you build the frontend yourself.
```bash theme={"dark"}
go build ./cmd/levelrail # control plane
go build ./cmd/levelrail-agent # node agent
go build ./cmd/levelrail-cli # CLI
```
The frontend is a separate Vite project in `web/`, embedded into the control plane binary at build time, so production runs no Node process. See `web/README.md` for the frontend commands.
```bash theme={"dark"}
cd web
npm install
npm run dev # Vite dev server
npm run build # type-check and production build
```
The control plane listens on `:8080` by default. For a throwaway local instance, start it with `APP_DEV_MODE=1`: it creates a fixed `dev`/`dev` admin and fixed API tokens from `dev-fixtures.yml` so you can skip sign-up.
Dev mode is for local use only. A release build (`-tags embedweb`) ignores `APP_DEV_MODE`, so it can never run this way in production.
## Installing just the CLI
`levelrail-cli` is a separate, small client binary for your own laptop or a CI runner, the same shape as `aws` or `gh`: install it locally, point it at a running instance, authenticate over the network, no SSH key and no inbound port on the server. The dashboard prints these same steps under **Settings, CLI access**, with a copy button on each command.
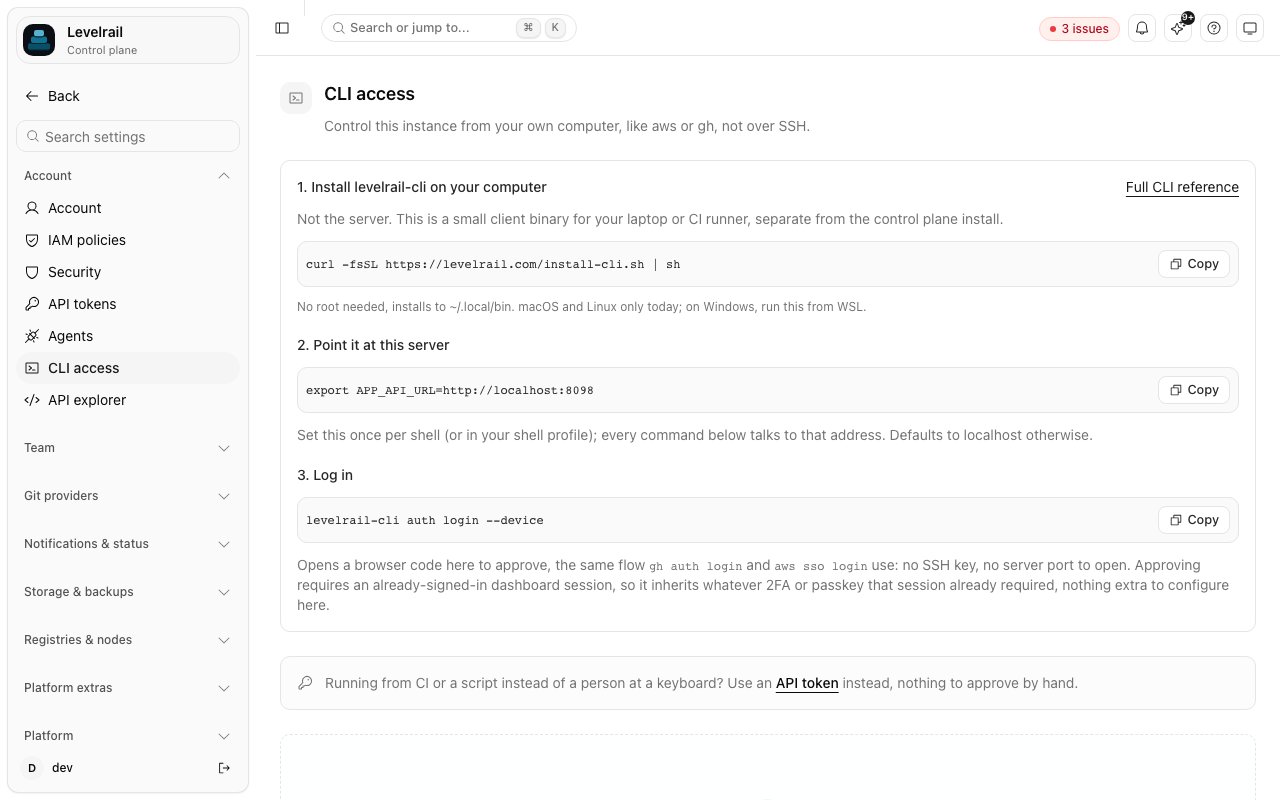 ```bash theme={"dark"}
curl -fsSL https://levelrail.com/install-cli.sh | sh
```
Detects your OS and architecture, verifies the release checksum (and its cosign signature, if `cosign` is installed) the same way `install.sh` does, and installs to `~/.local/bin`, no root needed. For a system-wide install, run with `sudo` and set `LEVELRAIL_CLI_INSTALL_DIR=/usr/local/bin`.
```bash theme={"dark"}
export APP_API_URL=https://your-dashboard-domain
```
```bash theme={"dark"}
levelrail-cli auth login --device
```
Prints a short code and opens a browser approval page on the control plane, the same model `gh auth login` and `aws sso login` use. Approving a code requires an already-authenticated dashboard session, so it inherits that account's two-factor or passkey requirement. Nothing extra to configure.
Mint an [API token](/getting-started#use-the-cli-from-your-laptop), then pass `--api-token` or set `APP_API_TOKEN`. This skips the device flow entirely.
See the [CLI reference](/cli-reference) for every command.
### Other ways to install the CLI
| Method | Command |
| - | - |
| Homebrew (macOS and Linux) | `brew install glincker/tap/levelrail-cli` |
| Go | `go install github.com/GLINCKER/levelrail/cmd/levelrail-cli@latest` |
| Direct download | Pick `levelrail-cli--` (`linux`, `darwin`, or `windows`; `amd64` or `arm64`) from the [releases page](https://github.com/glincker/levelrail/releases). Windows files end in `.exe`. |
Every release asset is listed in `checksums.txt`, which is signed with cosign and has a build provenance attestation. Windows binaries are published from the release after `v0.2.0-beta.15`; before that, run the install script from WSL.
## Verifying the install
`install.sh` already fails loudly if the control plane is not healthy within 60 seconds (`LEVELRAIL_HEALTH_WAIT`). Re-check at any time:
```bash theme={"dark"}
# Health check: the control plane responds
curl -fsS http://127.0.0.1:8080/healthz
# true until the first admin account exists
curl -fsS http://127.0.0.1:8080/api/v1/auth/setup-status
systemctl status levelrail
journalctl -u levelrail -f
```
Once you have an admin account and an API token (see [Getting started](/getting-started#use-the-cli-from-your-laptop)):
```bash theme={"dark"}
levelrail-cli version # compare running vs. latest published release
levelrail-cli status # check Docker reachability and system config
```
These call `GET /api/v1/updates` and `GET /api/v1/system/status`. A reply means the control plane is reachable and you are authenticated.
## Upgrading
Pick the path that matches how you installed. The self-update (next section) is the safest, because it restores the database as well as the binary on failure.
### Check first, then upgrade
`levelrail-cli upgrade` (or Settings > Updates in the dashboard) runs read-only preflight checks. Nothing is applied unless you start or schedule an upgrade, or you turned on automatic upgrades (off by default, see [Upgrade safely](/upgrade-safely#automatic-upgrades)).
| Check | Detail |
| - | - |
| Release signature | The latest release publishes `checksums.txt` and its cosign signature |
| Docker Engine | Version is not on the known-bad list (`kit/upgrade/docker_known_bad.json`; replace with your own file via `APP_DOCKER_KNOWN_BAD_FILE`) |
| Free disk | Above `APP_UPGRADE_MIN_FREE_BYTES` (default 2 GiB) |
| Control plane backup | Exists and is newer than `APP_UPGRADE_MAX_BACKUP_AGE` (default 26h). **Back up now** in the dashboard, or `levelrail-cli upgrade backup-now`, clears this blocker in one step |
The CLI also takes a fresh [control plane backup](/control-plane-backup) unless you pass `--no-backup`, then prints the exact command to run. The API is `GET /api/v1/updates/preflight`.
### Upgrade with automatic rollback
Settings > Updates > **Upgrade to vX.Y.Z now** (or **Schedule upgrade**) and `levelrail-cli upgrade --apply` run the safe self-update. It:
1. Downloads the release and checks its checksum and cosign signature.
2. Snapshots the database.
3. Tries the new release's migrations on a copy of that snapshot.
4. Swaps the binary, restarts, and waits for health.
If the new release is not healthy within `--timeout` (90 seconds by default), the previous binary and, when the schema changed, the pre-upgrade database snapshot come back automatically. Every attempt, with its step timeline, is kept on the Updates page.
```bash theme={"dark"}
levelrail-cli upgrade --plan # breaking changes between here and the latest release
levelrail-cli upgrade --apply --ack-breaking ID # acknowledge flagged ones, then upgrade
levelrail-cli upgrade --attempts # history with step timelines
```
The same engine runs on the host as `sudo levelrail self-upgrade --to `. See [Upgrade safely](/upgrade-safely) for the runbook and what to do when something fails.
### Run the upgrade
```bash theme={"dark"}
curl -fsSL https://levelrail.com/install.sh | sudo sh -s upgrade
```
Replaces the binary with the newest release and keeps your unit file, chosen ports (the `10-install.conf` drop-in, see [Server already runs a proxy](#server-already-runs-a-proxy)), `systemctl edit` overrides and data. It restarts the service and waits for it to come back healthy. If the new binary is not healthy within `LEVELRAIL_HEALTH_WAIT` seconds the previous binary is put back and started again.
The installer cannot undo a schema migration. For an upgrade that also restores the data, use the self-update above.
To pin a release instead of the latest:
```bash theme={"dark"}
curl -fsSL https://levelrail.com/install.sh \
| sudo LEVELRAIL_VERSION=v0.1.0 sh
```
Re-running the installer without arguments also works: it repairs the installation and rewrites the unit file, still keeping the ports in the drop-in.
Pull the new tag and recreate the container:
```bash theme={"dark"}
docker pull ghcr.io/glincker/levelrail:beta
docker compose up -d
```
Or with `docker run`:
```bash theme={"dark"}
docker rm -f levelrail
# Re-run the docker run command from the Docker page
```
The named volume holding `/var/lib/levelrail-data` persists across recreation.
Use this when you replace the binary yourself (a package, your own CI, `scp`). Build from a checkout with the version stamped (`scripts/build-linux.sh [amd64|arm64]`, output `dist/levelrail`), then swap it and run `upgrade-note` so upgrade history does not show an unknown initiator:
```bash theme={"dark"}
sudo systemctl stop levelrail
sudo install -m 0755 ./levelrail-linux-amd64 /usr/local/bin/levelrail
sudo levelrail upgrade-note --by "$USER" --reason "manual swap"
sudo systemctl start levelrail
```
Run `upgrade-note` after replacing the file and before starting the service. It names the version of the binary that runs it, so it must be the new binary. `--method` is `manual` (default), `package` or `ci`; `--data-dir` defaults to `APP_DATA_DIR`. See [Upgrade history](/upgrade-history).
### Older binary refuses to start
A binary older than the database exits with status 78 and prints which release last ran on the data and the exact commands to recover. The installer's unit adds `RestartPreventExitStatus=78`, so systemd does not restart-loop it. Nothing is modified: migrations only go forward.
Run the release it names (`LEVELRAIL_VERSION=vX.Y.Z ... install.sh upgrade`) or restore a backup taken by the older release.
### Rolling back
Before pending migrations run, the control plane snapshots its database as `levelrail-.db` under the data directory's backups folder. To go back after a bad upgrade, install the previous binary, stop the service, then:
```bash theme={"dark"}
levelrail restore-snapshot --list # newest first
levelrail restore-snapshot --dry-run latest # verify only, change nothing
levelrail restore-snapshot latest # asks for confirmation (--yes to skip)
```
The live database is kept beside the restored one as `.before-restore-`. The master key is not part of a snapshot.
## Uninstalling
```bash theme={"dark"}
# removes the service, unit file, and binary; keeps /var/lib/levelrail-data
curl -fsSL https://levelrail.com/install.sh | sudo sh -s uninstall
# also deletes the data directory (database, master key, certificates)
curl -fsSL https://levelrail.com/install.sh | sudo sh -s uninstall --purge
```
`--purge` deletes all app and deploy state, and the master key every stored secret is encrypted with.
```bash theme={"dark"}
docker rm -f levelrail levelrail-agent
docker volume rm levelrail-data
```
Uninstalling does not touch Docker itself or any containers, images, or volumes Levelrail created for your deployed apps, and `install.sh uninstall` leaves `levelrail-cli` in place. Remove those separately if needed.
## Getting help
* Ran into a specific error? Check [Troubleshooting](/troubleshooting) first.
* Bugs, questions, feature requests: open an issue on [GitHub](https://github.com/glincker/levelrail/issues).
* Everything else: email [support@levelrail.com](mailto:support@levelrail.com).
## Next steps
Sign in and deploy your first app.
Run the control plane and agent as containers.
Preflight checks, scheduled upgrades and automatic rollback.
Run next to Coolify, Traefik, nginx or Caddy.
This documentation is built and hosted on [Mintlify](https://mintlify.com), a developer documentation platform.
```bash theme={"dark"}
curl -fsSL https://levelrail.com/install-cli.sh | sh
```
Detects your OS and architecture, verifies the release checksum (and its cosign signature, if `cosign` is installed) the same way `install.sh` does, and installs to `~/.local/bin`, no root needed. For a system-wide install, run with `sudo` and set `LEVELRAIL_CLI_INSTALL_DIR=/usr/local/bin`.
```bash theme={"dark"}
export APP_API_URL=https://your-dashboard-domain
```
```bash theme={"dark"}
levelrail-cli auth login --device
```
Prints a short code and opens a browser approval page on the control plane, the same model `gh auth login` and `aws sso login` use. Approving a code requires an already-authenticated dashboard session, so it inherits that account's two-factor or passkey requirement. Nothing extra to configure.
Mint an [API token](/getting-started#use-the-cli-from-your-laptop), then pass `--api-token` or set `APP_API_TOKEN`. This skips the device flow entirely.
See the [CLI reference](/cli-reference) for every command.
### Other ways to install the CLI
| Method | Command |
| - | - |
| Homebrew (macOS and Linux) | `brew install glincker/tap/levelrail-cli` |
| Go | `go install github.com/GLINCKER/levelrail/cmd/levelrail-cli@latest` |
| Direct download | Pick `levelrail-cli--` (`linux`, `darwin`, or `windows`; `amd64` or `arm64`) from the [releases page](https://github.com/glincker/levelrail/releases). Windows files end in `.exe`. |
Every release asset is listed in `checksums.txt`, which is signed with cosign and has a build provenance attestation. Windows binaries are published from the release after `v0.2.0-beta.15`; before that, run the install script from WSL.
## Verifying the install
`install.sh` already fails loudly if the control plane is not healthy within 60 seconds (`LEVELRAIL_HEALTH_WAIT`). Re-check at any time:
```bash theme={"dark"}
# Health check: the control plane responds
curl -fsS http://127.0.0.1:8080/healthz
# true until the first admin account exists
curl -fsS http://127.0.0.1:8080/api/v1/auth/setup-status
systemctl status levelrail
journalctl -u levelrail -f
```
Once you have an admin account and an API token (see [Getting started](/getting-started#use-the-cli-from-your-laptop)):
```bash theme={"dark"}
levelrail-cli version # compare running vs. latest published release
levelrail-cli status # check Docker reachability and system config
```
These call `GET /api/v1/updates` and `GET /api/v1/system/status`. A reply means the control plane is reachable and you are authenticated.
## Upgrading
Pick the path that matches how you installed. The self-update (next section) is the safest, because it restores the database as well as the binary on failure.
### Check first, then upgrade
`levelrail-cli upgrade` (or Settings > Updates in the dashboard) runs read-only preflight checks. Nothing is applied unless you start or schedule an upgrade, or you turned on automatic upgrades (off by default, see [Upgrade safely](/upgrade-safely#automatic-upgrades)).
| Check | Detail |
| - | - |
| Release signature | The latest release publishes `checksums.txt` and its cosign signature |
| Docker Engine | Version is not on the known-bad list (`kit/upgrade/docker_known_bad.json`; replace with your own file via `APP_DOCKER_KNOWN_BAD_FILE`) |
| Free disk | Above `APP_UPGRADE_MIN_FREE_BYTES` (default 2 GiB) |
| Control plane backup | Exists and is newer than `APP_UPGRADE_MAX_BACKUP_AGE` (default 26h). **Back up now** in the dashboard, or `levelrail-cli upgrade backup-now`, clears this blocker in one step |
The CLI also takes a fresh [control plane backup](/control-plane-backup) unless you pass `--no-backup`, then prints the exact command to run. The API is `GET /api/v1/updates/preflight`.
### Upgrade with automatic rollback
Settings > Updates > **Upgrade to vX.Y.Z now** (or **Schedule upgrade**) and `levelrail-cli upgrade --apply` run the safe self-update. It:
1. Downloads the release and checks its checksum and cosign signature.
2. Snapshots the database.
3. Tries the new release's migrations on a copy of that snapshot.
4. Swaps the binary, restarts, and waits for health.
If the new release is not healthy within `--timeout` (90 seconds by default), the previous binary and, when the schema changed, the pre-upgrade database snapshot come back automatically. Every attempt, with its step timeline, is kept on the Updates page.
```bash theme={"dark"}
levelrail-cli upgrade --plan # breaking changes between here and the latest release
levelrail-cli upgrade --apply --ack-breaking ID # acknowledge flagged ones, then upgrade
levelrail-cli upgrade --attempts # history with step timelines
```
The same engine runs on the host as `sudo levelrail self-upgrade --to `. See [Upgrade safely](/upgrade-safely) for the runbook and what to do when something fails.
### Run the upgrade
```bash theme={"dark"}
curl -fsSL https://levelrail.com/install.sh | sudo sh -s upgrade
```
Replaces the binary with the newest release and keeps your unit file, chosen ports (the `10-install.conf` drop-in, see [Server already runs a proxy](#server-already-runs-a-proxy)), `systemctl edit` overrides and data. It restarts the service and waits for it to come back healthy. If the new binary is not healthy within `LEVELRAIL_HEALTH_WAIT` seconds the previous binary is put back and started again.
The installer cannot undo a schema migration. For an upgrade that also restores the data, use the self-update above.
To pin a release instead of the latest:
```bash theme={"dark"}
curl -fsSL https://levelrail.com/install.sh \
| sudo LEVELRAIL_VERSION=v0.1.0 sh
```
Re-running the installer without arguments also works: it repairs the installation and rewrites the unit file, still keeping the ports in the drop-in.
Pull the new tag and recreate the container:
```bash theme={"dark"}
docker pull ghcr.io/glincker/levelrail:beta
docker compose up -d
```
Or with `docker run`:
```bash theme={"dark"}
docker rm -f levelrail
# Re-run the docker run command from the Docker page
```
The named volume holding `/var/lib/levelrail-data` persists across recreation.
Use this when you replace the binary yourself (a package, your own CI, `scp`). Build from a checkout with the version stamped (`scripts/build-linux.sh [amd64|arm64]`, output `dist/levelrail`), then swap it and run `upgrade-note` so upgrade history does not show an unknown initiator:
```bash theme={"dark"}
sudo systemctl stop levelrail
sudo install -m 0755 ./levelrail-linux-amd64 /usr/local/bin/levelrail
sudo levelrail upgrade-note --by "$USER" --reason "manual swap"
sudo systemctl start levelrail
```
Run `upgrade-note` after replacing the file and before starting the service. It names the version of the binary that runs it, so it must be the new binary. `--method` is `manual` (default), `package` or `ci`; `--data-dir` defaults to `APP_DATA_DIR`. See [Upgrade history](/upgrade-history).
### Older binary refuses to start
A binary older than the database exits with status 78 and prints which release last ran on the data and the exact commands to recover. The installer's unit adds `RestartPreventExitStatus=78`, so systemd does not restart-loop it. Nothing is modified: migrations only go forward.
Run the release it names (`LEVELRAIL_VERSION=vX.Y.Z ... install.sh upgrade`) or restore a backup taken by the older release.
### Rolling back
Before pending migrations run, the control plane snapshots its database as `levelrail-.db` under the data directory's backups folder. To go back after a bad upgrade, install the previous binary, stop the service, then:
```bash theme={"dark"}
levelrail restore-snapshot --list # newest first
levelrail restore-snapshot --dry-run latest # verify only, change nothing
levelrail restore-snapshot latest # asks for confirmation (--yes to skip)
```
The live database is kept beside the restored one as `.before-restore-`. The master key is not part of a snapshot.
## Uninstalling
```bash theme={"dark"}
# removes the service, unit file, and binary; keeps /var/lib/levelrail-data
curl -fsSL https://levelrail.com/install.sh | sudo sh -s uninstall
# also deletes the data directory (database, master key, certificates)
curl -fsSL https://levelrail.com/install.sh | sudo sh -s uninstall --purge
```
`--purge` deletes all app and deploy state, and the master key every stored secret is encrypted with.
```bash theme={"dark"}
docker rm -f levelrail levelrail-agent
docker volume rm levelrail-data
```
Uninstalling does not touch Docker itself or any containers, images, or volumes Levelrail created for your deployed apps, and `install.sh uninstall` leaves `levelrail-cli` in place. Remove those separately if needed.
## Getting help
* Ran into a specific error? Check [Troubleshooting](/troubleshooting) first.
* Bugs, questions, feature requests: open an issue on [GitHub](https://github.com/glincker/levelrail/issues).
* Everything else: email [support@levelrail.com](mailto:support@levelrail.com).
## Next steps
Sign in and deploy your first app.
Run the control plane and agent as containers.
Preflight checks, scheduled upgrades and automatic rollback.
Run next to Coolify, Traefik, nginx or Caddy.
This documentation is built and hosted on [Mintlify](https://mintlify.com), a developer documentation platform.

