> ## Documentation Index
> Fetch the complete documentation index at: https://docs.levelrail.com/llms.txt
> Use this file to discover all available pages before exploring further.
# Getting started
> Install Levelrail on a Linux server, sign in, and deploy your first app in about ten minutes, from the dashboard or the CLI.
By the end of this page you have a Levelrail control plane on your own server and one app running on it with a health check, logs, and one-click rollback. Plan on about ten minutes.
```mermaid theme={"dark"}
flowchart LR
A["Install
one command"] --> B["Sign in
setup token"]
B --> C["Setup wizard
domain + git"]
C --> D["Deploy an app
dashboard or CLI"]
D --> E["Live, with logs,
metrics, rollback"]
```
## Before you start
* A Linux server, `amd64` or `arm64`, with systemd and root access. 1 vCPU and 1 GB of RAM boots the platform, but 2 vCPU and 2 GB is more comfortable once you build images on it.
* Ports 80 and 443 reachable from the internet. Port 80 is what Let's Encrypt uses to issue certificates.
* Optional but recommended: a domain you can point at the server.
The full requirements list, with what the installer checks, is in [Installing](/installing#requirements).
## Install
`curl -fsSL https://levelrail.com/install.sh | sudo sh`
The script checks the host, installs Docker if it is missing, downloads the newest release and verifies its checksum, starts a `levelrail` systemd service, and waits until it reports healthy. It ends by printing:
* the dashboard URL, for example `http://203.0.113.10:8080`
* a one-time **setup token** link for creating the first admin
* a reminder to back up `master.key` in the data directory
Use the port from your own output. If 8080 was taken, the installer picked the next free one.
Pin a release with `LEVELRAIL_VERSION=v0.2.0-beta.14`, or run it as a container instead. Both are covered in [Installing](/installing).
## Sign in and run the setup wizard
Open the printed setup link, choose a password, and you are the admin. The first sign-in opens a setup wizard, not an empty app list:
1. **Server check** runs the same checks as `levelrail-cli doctor`. Each failure shows a command to fix it and a docs link. Only Docker, the database, or the data directory failing blocks you.
2. **Topology** (optional) explains single node versus [multi-node](/multi-node). Single node is the default and nothing needs deciding now.
3. **Dashboard domain** (optional, recommended) shows the exact DNS record to create, then watches DNS and the HTTPS certificate until both are green. Use a dedicated name such as `console.example.com`, not a domain an app will serve.
4. **Email** (optional) saves an SMTP server and sends a test message, so password resets and alert emails work. SES and Resend are set up under **Settings, Email**.
5. **Git provider** (optional) connects GitHub, GitLab, Bitbucket, or Gitea.
6. **First app** deploys a sample, a template, or your own repository, and waits until it is healthy. A failure shows the automatic diagnosis and a link to the logs.
7. **Done** links to alerts, backup targets, and inviting teammates.
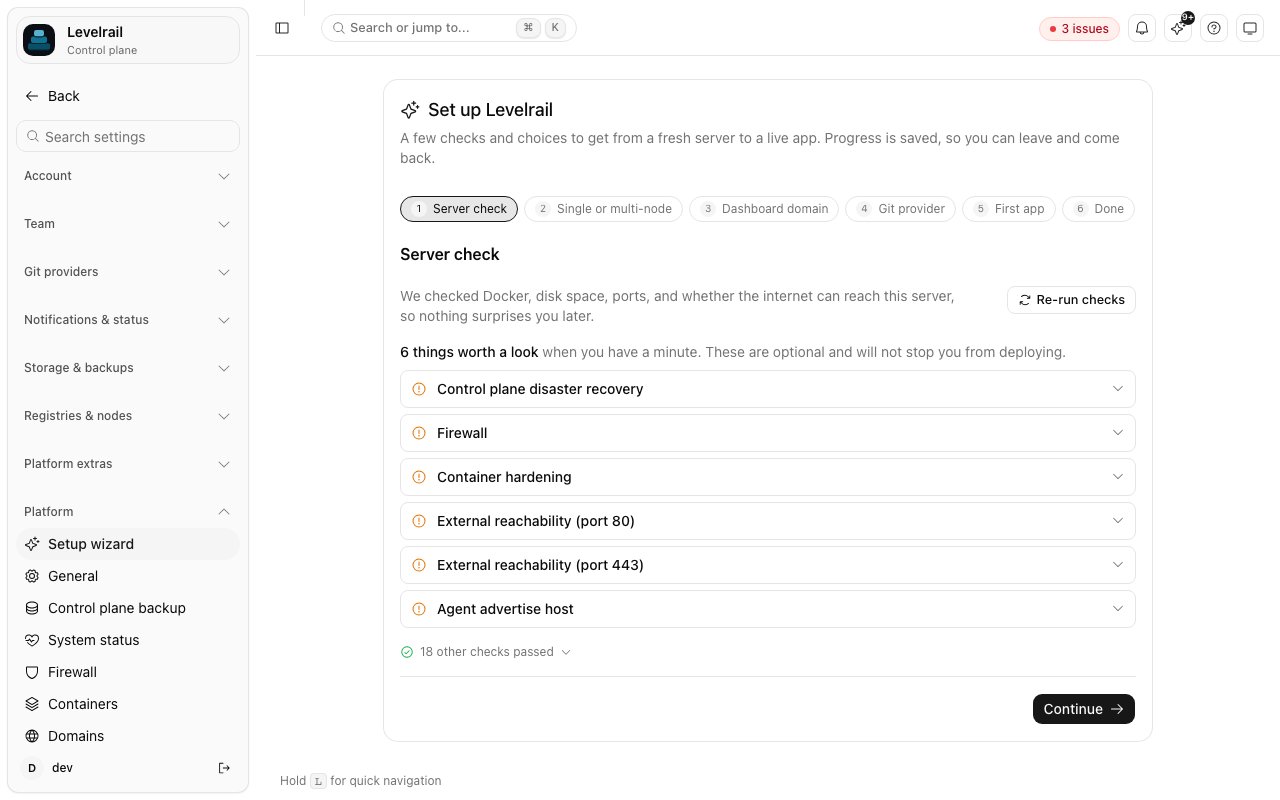 Progress is saved on the server, so you can close the tab and resume from any browser. Reopen the wizard any time from **Settings, Setup wizard**.
Lost the setup token? On the server run `sudo APP_DATA_DIR=/var/lib/levelrail-data levelrail setup-token`.
## Deploy your first app
Pick the route that matches what you have.
In the dashboard choose **New app**, paste a repository URL, and review the deployment plan Levelrail shows before it creates anything: build method, port, environment variables, volumes, and warnings. Confirm and watch the build log stream live.
From a terminal, the same flow is:
```
levelrail-cli import https://github.com/your-org/your-app --deploy
```
Without `--deploy` it prints the plan and stops. Every accepted input, including `docker run` commands, compose files, and Dockerfiles, is listed in [Importing apps](/importing-apps).
```
levelrail-cli apps create --name web --image ghcr.io/your-org/web:1.0 --port 8080
```
`levelrail-cli init` detects your stack and writes an `app.yaml` for it, validated by the platform's own validator. A minimal spec looks like this:
```yaml theme={"dark"}
version: 1
services:
web:
build:
type: dockerfile
port: 8080
domains:
- app.example.com
health:
readiness: { path: /healthz, interval: 5s, timeout: 2s }
```
Then create the app from it:
```
levelrail-cli apps create --file app.yaml --repo https://github.com/your-org/your-app --image-repo ghcr.io/your-org/your-app
```
Every field, including resources, environment, replicas, and deploy strategy, is in the [app spec reference](/app-spec-reference).
`levelrail-cli apps create --interactive` asks for the name, source, port, domain, health path, and limits, then either writes `app.yaml` or creates the app. `databases create --interactive` does the same for a [managed database](/managing-databases).
### Check on it
```
levelrail-cli apps status web
levelrail-cli apps logs web --follow
```
Status shows the reconciler's conditions, each with a reason string, so a failing deploy tells you why instead of spinning. In the dashboard the same app has live metrics with deploy markers on the charts, the deploy history with one-click rollback, and a log viewer with search.
Progress is saved on the server, so you can close the tab and resume from any browser. Reopen the wizard any time from **Settings, Setup wizard**.
Lost the setup token? On the server run `sudo APP_DATA_DIR=/var/lib/levelrail-data levelrail setup-token`.
## Deploy your first app
Pick the route that matches what you have.
In the dashboard choose **New app**, paste a repository URL, and review the deployment plan Levelrail shows before it creates anything: build method, port, environment variables, volumes, and warnings. Confirm and watch the build log stream live.
From a terminal, the same flow is:
```
levelrail-cli import https://github.com/your-org/your-app --deploy
```
Without `--deploy` it prints the plan and stops. Every accepted input, including `docker run` commands, compose files, and Dockerfiles, is listed in [Importing apps](/importing-apps).
```
levelrail-cli apps create --name web --image ghcr.io/your-org/web:1.0 --port 8080
```
`levelrail-cli init` detects your stack and writes an `app.yaml` for it, validated by the platform's own validator. A minimal spec looks like this:
```yaml theme={"dark"}
version: 1
services:
web:
build:
type: dockerfile
port: 8080
domains:
- app.example.com
health:
readiness: { path: /healthz, interval: 5s, timeout: 2s }
```
Then create the app from it:
```
levelrail-cli apps create --file app.yaml --repo https://github.com/your-org/your-app --image-repo ghcr.io/your-org/your-app
```
Every field, including resources, environment, replicas, and deploy strategy, is in the [app spec reference](/app-spec-reference).
`levelrail-cli apps create --interactive` asks for the name, source, port, domain, health path, and limits, then either writes `app.yaml` or creates the app. `databases create --interactive` does the same for a [managed database](/managing-databases).
### Check on it
```
levelrail-cli apps status web
levelrail-cli apps logs web --follow
```
Status shows the reconciler's conditions, each with a reason string, so a failing deploy tells you why instead of spinning. In the dashboard the same app has live metrics with deploy markers on the charts, the deploy history with one-click rollback, and a log viewer with search.
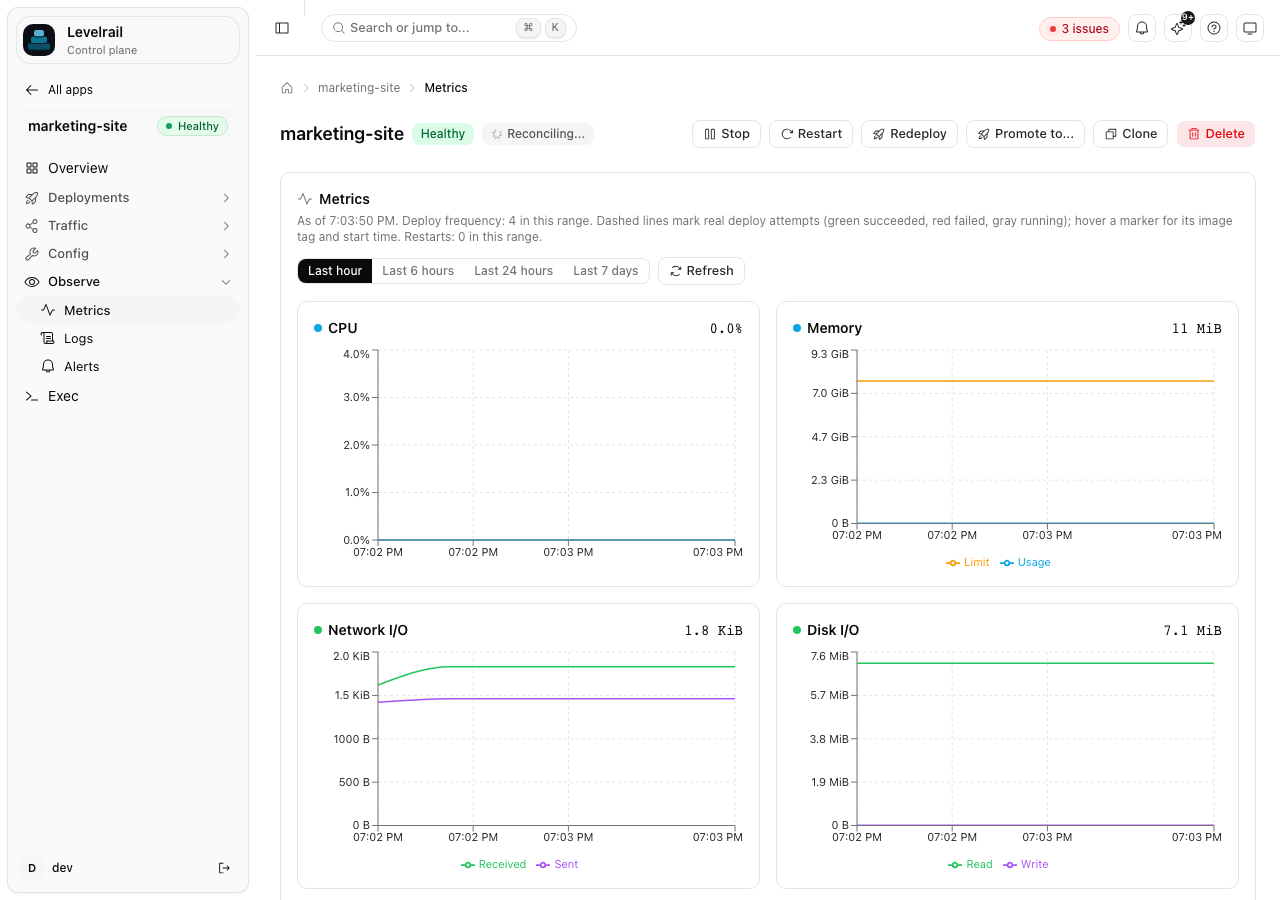 To go back to the previous version, use the deploy history in the dashboard, or run `levelrail-cli apps deploys list web` and then `levelrail-cli apps deploys rollback-to web `. Prior images are pinned, so garbage collection cannot remove a rollback target.
## Use the CLI from your laptop
`levelrail-cli` is a small client you install on your own machine. It talks to the control plane over HTTPS, with no SSH key and no inbound port.
```
curl -fsSL https://levelrail.com/install-cli.sh | sh
export APP_API_URL=https://console.example.com
levelrail-cli auth login --device
```
`--device` prints a short code and asks you to approve it in the dashboard, the same model as `gh auth login`, so it inherits your two-factor setup. For CI, create an API token under **Settings, API tokens** and pass it as `APP_API_TOKEN`.
## Finish setting up for real use
Once you are signed in, the dashboard home shows live stats, recent activity, and a **Needs attention** list built from the same server checks as the wizard:
To go back to the previous version, use the deploy history in the dashboard, or run `levelrail-cli apps deploys list web` and then `levelrail-cli apps deploys rollback-to web `. Prior images are pinned, so garbage collection cannot remove a rollback target.
## Use the CLI from your laptop
`levelrail-cli` is a small client you install on your own machine. It talks to the control plane over HTTPS, with no SSH key and no inbound port.
```
curl -fsSL https://levelrail.com/install-cli.sh | sh
export APP_API_URL=https://console.example.com
levelrail-cli auth login --device
```
`--device` prints a short code and asks you to approve it in the dashboard, the same model as `gh auth login`, so it inherits your two-factor setup. For CI, create an API token under **Settings, API tokens** and pass it as `APP_API_TOKEN`.
## Finish setting up for real use
Once you are signed in, the dashboard home shows live stats, recent activity, and a **Needs attention** list built from the same server checks as the wizard:
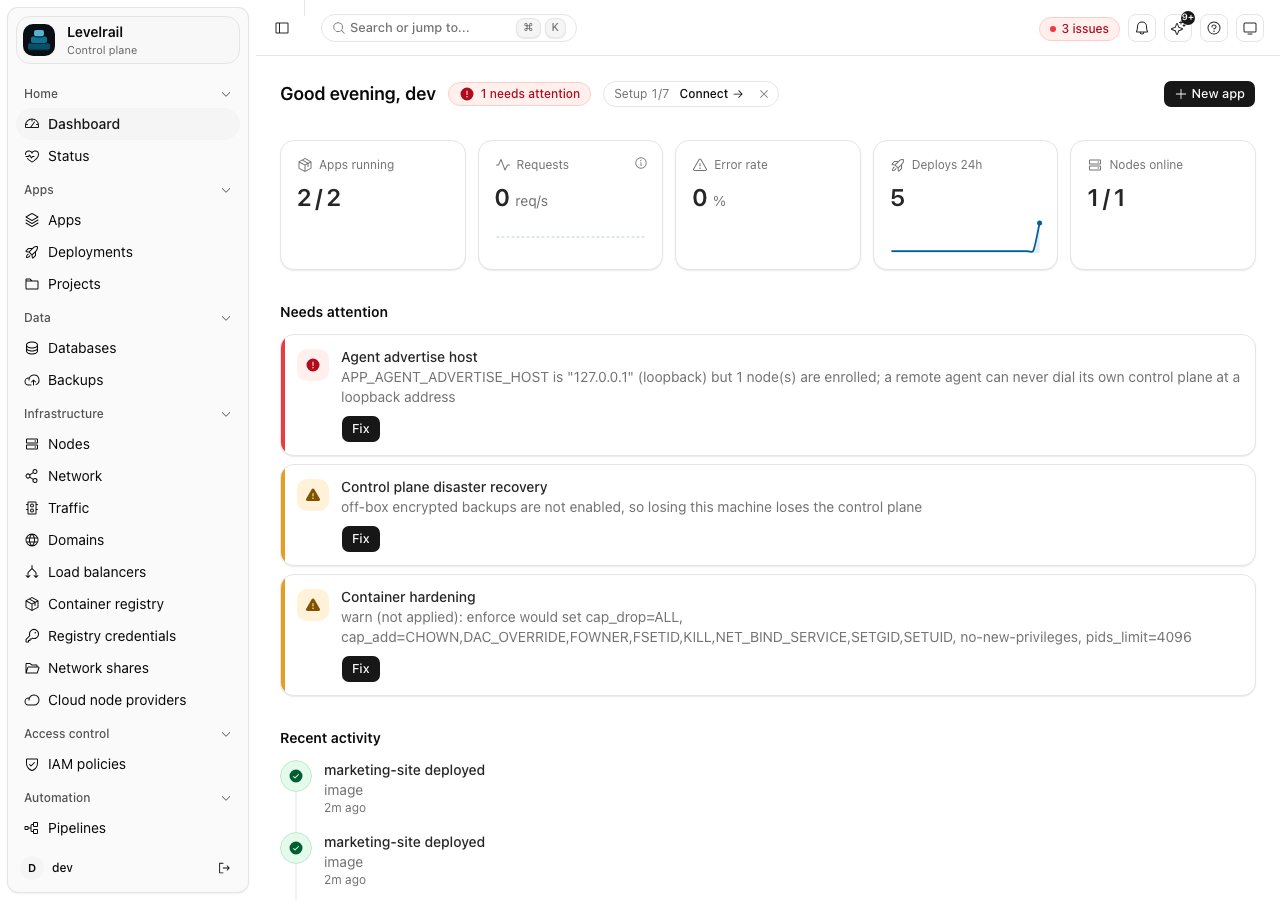 The sidebar also has a **Get started** item, and the home page a "Setup N% ready" chip, until you hide the guide or every step is settled. It is a checklist driven by live state: each step flips to done on its own the moment the real thing exists, with no reload.
| Step | Done when | Optional |
| - | - | - |
| Secure the admin account | The account has two-factor authentication or a passkey | no |
| Set the public dashboard address | The dashboard URL is an `https://` address | no |
| Connect a Git provider | GitHub, GitLab, Bitbucket, or Gitea is connected | yes |
| Deploy your first app | At least one app exists | no |
| Put the app on your domain | A domain is attached to an app | no |
| Connect a DNS provider or proxy | Cloudflare or Route 53 is connected, or you run behind a proxy | yes |
| Get a valid TLS certificate | Every domain has a healthy certificate (not needed behind a proxy that terminates TLS) | no |
| Add a backup target | A backup target exists | no |
| Take the first backup | A control plane backup exists | no |
| Verify a restore | A backup has passed verification | no |
| Add a notification channel and alert rule | A channel exists and an alert rule is set | no |
| Invite a teammate | A second user or a pending invite exists | yes |
| Choose an upgrade policy | Automatic upgrades are enabled | yes |
Each step has a one-line explanation, a time estimate, and a button that opens the exact page or dialog for it. A step that depends on another (a domain needs an app, a first backup needs a target) says what to do first. "Ready for production" is the share of required steps that are done. Steps that do not apply to you, such as TLS behind your own proxy, show as "Not needed" and stay out of that number.
You can **Skip** a step, **Mark done** for something the guide cannot see, and **Undo** either. **Hide for now** removes the sidebar item and chip, and **Reset** clears every skip and manual mark. Both are stored on the server, so they follow you across browsers. Pages that belong to an unfinished step, such as backup targets, show a one-line reminder that links back to the guide.
The same checklist is available from a terminal:
```
levelrail-cli setup status
levelrail-cli setup next
levelrail-cli setup skip teammate
```
Do the backup steps before anything else. Your control plane database and `master.key` are the two things you cannot recreate.
## Where to go next
Run Postgres, Redis, or another database next to your app.
Deploy a pre-made service such as Plausible or Uptime Kuma.
Add custom domains and understand certificates.
Deploy on every push, with previews per pull request.
Add a second server.
Get alerted when something breaks.
Not sure what is stable? See [Feature status](/feature-status). Hit a problem? See [Troubleshooting](/troubleshooting).
Every CLI command, output format (`--output`, `--query`), and shell completion option is in the [CLI reference](/cli-reference). To build from source or run a development instance, see [Installing](/installing#option-3-build-from-source).
This documentation is built and hosted on [Mintlify](https://mintlify.com), a developer documentation platform.
The sidebar also has a **Get started** item, and the home page a "Setup N% ready" chip, until you hide the guide or every step is settled. It is a checklist driven by live state: each step flips to done on its own the moment the real thing exists, with no reload.
| Step | Done when | Optional |
| - | - | - |
| Secure the admin account | The account has two-factor authentication or a passkey | no |
| Set the public dashboard address | The dashboard URL is an `https://` address | no |
| Connect a Git provider | GitHub, GitLab, Bitbucket, or Gitea is connected | yes |
| Deploy your first app | At least one app exists | no |
| Put the app on your domain | A domain is attached to an app | no |
| Connect a DNS provider or proxy | Cloudflare or Route 53 is connected, or you run behind a proxy | yes |
| Get a valid TLS certificate | Every domain has a healthy certificate (not needed behind a proxy that terminates TLS) | no |
| Add a backup target | A backup target exists | no |
| Take the first backup | A control plane backup exists | no |
| Verify a restore | A backup has passed verification | no |
| Add a notification channel and alert rule | A channel exists and an alert rule is set | no |
| Invite a teammate | A second user or a pending invite exists | yes |
| Choose an upgrade policy | Automatic upgrades are enabled | yes |
Each step has a one-line explanation, a time estimate, and a button that opens the exact page or dialog for it. A step that depends on another (a domain needs an app, a first backup needs a target) says what to do first. "Ready for production" is the share of required steps that are done. Steps that do not apply to you, such as TLS behind your own proxy, show as "Not needed" and stay out of that number.
You can **Skip** a step, **Mark done** for something the guide cannot see, and **Undo** either. **Hide for now** removes the sidebar item and chip, and **Reset** clears every skip and manual mark. Both are stored on the server, so they follow you across browsers. Pages that belong to an unfinished step, such as backup targets, show a one-line reminder that links back to the guide.
The same checklist is available from a terminal:
```
levelrail-cli setup status
levelrail-cli setup next
levelrail-cli setup skip teammate
```
Do the backup steps before anything else. Your control plane database and `master.key` are the two things you cannot recreate.
## Where to go next
Run Postgres, Redis, or another database next to your app.
Deploy a pre-made service such as Plausible or Uptime Kuma.
Add custom domains and understand certificates.
Deploy on every push, with previews per pull request.
Add a second server.
Get alerted when something breaks.
Not sure what is stable? See [Feature status](/feature-status). Hit a problem? See [Troubleshooting](/troubleshooting).
Every CLI command, output format (`--output`, `--query`), and shell completion option is in the [CLI reference](/cli-reference). To build from source or run a development instance, see [Installing](/installing#option-3-build-from-source).
This documentation is built and hosted on [Mintlify](https://mintlify.com), a developer documentation platform.